Autel MaxiDas DS808 Software and Firmware Update Manual
Matched product:
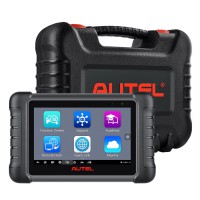
Autel MaxiDAS DS808K Full System Diagnostic Tool with OBD1 Adapters Support VAG Guided Functions
Latest price:£798.00£574.0028% off
- Item No. SP297-B
- Out Of Stock
Autel MaxiDAS DS808K full set is handheld 7-inch Touch Screen Android System Autel Diagnostic Tool for more than 80 US, Asian and European vehicle makes, also support New Function Injector Coding. It is featured with an extensive coverage of OE-level diagnostics. Installed with a fast quad-core processor, DS808 provides you with access to the electronic control unit (ECU) for various vehicle control systems, such as engine, transmission, anti-lock brake system (ABS), airbag system (SRS) and more
autel-maxidas-ds808k-kit-user-manual-autelstore.pdf (4.6M)
Firmware Upgrade for Autel MaxiDas DS808
This option allows you to update the firmware of the scan tool. Connect the scan tablet with the vehicle through DLC or use the mini USB cable for power supply. Follow the on-screen instructions to complete the operation. Internet connection is necessary for this operation.

How to Set "Auto Update" for Autel DS808?
The Auto Update allows the tool to automatically update the OS, the MaxiDAS system, and the Vehicle. All you need to do is to switch ON by tapping the button on the right side of each and set the desired automatic update time.
To set auto system or vehicle update
1. Tap the Settings application on the MaxiDAS Job Menu.
2. Tap the Auto Update option on the left column. The three auto update items list on the right.
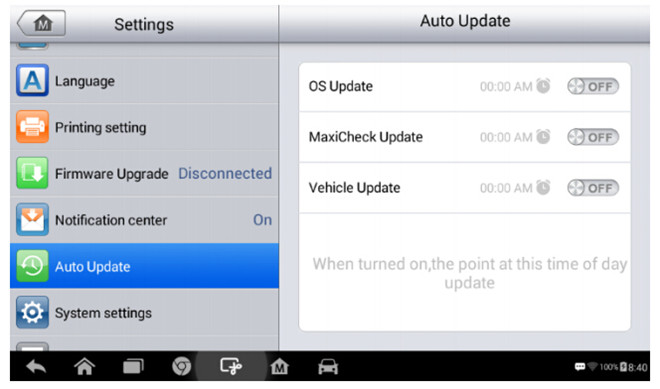
3. Switch the ON the button on the right of item that you want to auto update.
4. Tap on the time to set time, you can use the + and – button or tap on the numbers then the manual input screen will pop up. Tap Done to complete the time setting.
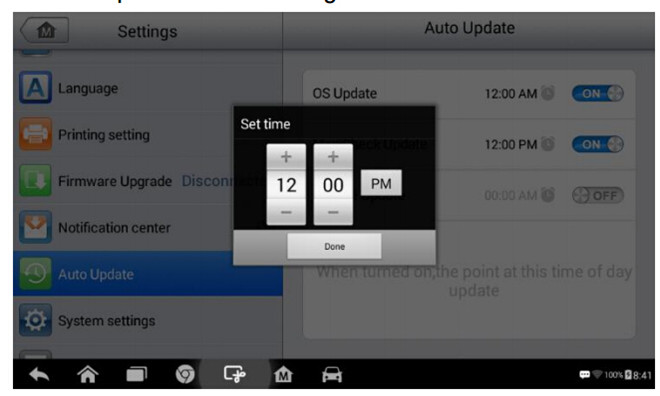
NOTE: Internet connection is necessary for auto update, otherwise it would not work even if you have already switch it on. Make sure the tool is connected to the Internet for the time you have set.
Software Update for Autel MaxiDas DS808
The Update application allows you to download the latest released software.
The updates can improve the MaxiDAS applications’ capabilities, typically by adding new tests, new models, or enhanced applications to the database.
The Display Tablet automatically searches for available updates for all of the MaxiDAS software when it is connected to the internet. Any updates that are found can be downloaded and installed on the device. This section describes installing an update to the MaxiDAS System. A notification message displays if an update is available when the Notifications Center function is enabled in the Settings application
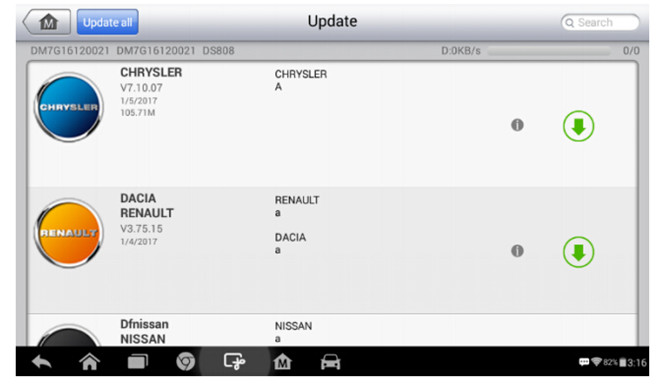
How To update the software for DS808 Full Kit
1. Make sure the Display Tablet is connected to a power source with stable access to the internet.
2. Tap the Update application button from the MaxiDAS Job Menu; or tap the update notification message when received one; or tap the Update icon on Vehicle Menu in Diagnostics application. The Update application screen displays.
3. Check all available updates:
If you decide to update all the items, tap the Update All button.
If you only want to update one or some of the item(s), tap the Update button on the right column of the specific item(s).
4. Tap the Pause button to suspend the updating process. When you tap Continue to renew the update, the updating process will resume from the break point.
5. When the updating process is completed, the firmware will be installed automatically. The previous version will be replaced.
Registration for Autel MaxiDas DS808
In order to get access to the Support platform and obtain update and other services from Autel, you are required to register the MaxiDAS Diagnostic Device the first time you use it.
How To register the diagnostic device
1. Visit the website: //pro.autel.com.
2. On the Sign In page, input your account ID and other information to log in, if you already have an account.
3. If you are a new member to Autel and do not have an account yet, click the Create Autel ID button on the left side.
4. Enter the required information in the input fields, read through Autel’s Terms and Conditions and tick on Agree, and then click Create Autel ID at the bottom to continue.
5. The online system will automatically send a confirmation email to the registered email address. Validate your account by clicking the link provided through the mail. A product registration screen opens.
6. Find out the device’s serial number and password from the About section of the Settings application on the Display Tablet.
7. Select the product model of your device, enter the product serial number and password on the Product Registration screen, and click Submit to complete the registration procedure.
Printing Setting for Autel DS808
This option allows you to print any data or information anywhere and anytime via Wi-Fi connection.
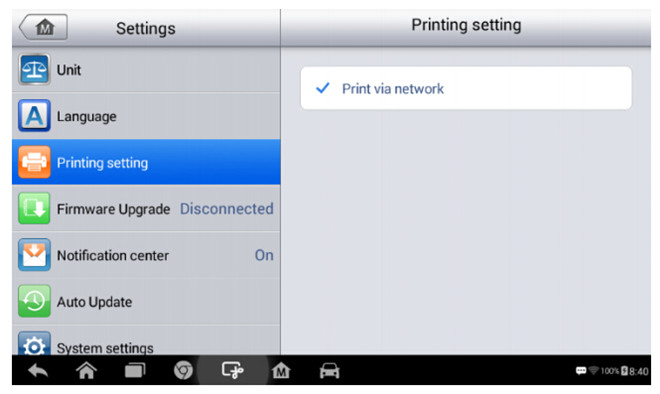
How To setup the printer connection
1. Tap the Settings application on the MaxiDAS Job Menu.
2. Tap the Printing Setting option on the left column.
3. Tap the Print via Network item to activate the printing function,which enables the device to send files to the printer through the PC via Wi-Fi connection.
4. Tap the Home button on the top left corner to return to the MaxiDAS Job Menu. Or select another setting option for system setup.
Printing via APP
DS808 provides the most convenient printing method, printing via APP.
To realize this function, please make sure a Wi-Fi printer is available and then purchase a Wi-Fi printer APP and install it onto your Display Tablet.
By a simple click on the Print button of a saved file on the Display Tablet, the file will be printed automatically
Printing via PC
If the Wi-Fi printer is not available, you can also use your PC to print the data on the Display Tablet. Follow the instructions below to realize this function.
To install the printer driver program to a computer
1. Download the Maxi PC Suite from www.autel.com and install to your PC.
2. Double click on Setup.exe item.
3. Select the installation language and the wizard will load momentarily.
4. Follow the instructions on the screen and click Next to continue.
5. Click on Install and the printer driver program will be installed onto the computer.
6. Click on Finish to complete the whole installation procedure.
NOTE The MaxiSys Printer runs automatically after the installation. Before printing make sure the Display Tablet is connected to the same network with the computer, either via WiFi or LAN. And the computer is connected to a printer.
How To perform printing through the computer
1. Run the MaxiSys Printer program on the computer.
2. Click Test Print to make sure the printer is working successfully.
3. Tap the Print button on the toolbar. A temporary document will be created and sent to the computer for printing and the received document automatically when the Auto Print option is selected.
4. Tap the Print button on the toolbar of the Display Tablet. A temporary document will be created and sent to the computer.
If the Auto Print option in the MaxiSys Printer is selected, the MaxiSys Printer will print the received document automatically.
If the Auto Print option is not selected, click Open PDF File button to view all the temporary files. Select the file(s) you want to print and click Print.
Difference Among Maxidas DS808, Maxisys MS906, Maxidas DS708, Maxisys MS908, Maxisys MS908P
| Autel | Autel MaxiDas DS808 | Autel MaxiSYS MS906 | Autel MaxiDas DS708 | Autel MaxiSYS MS908 | Autel MaxiSYS MS908P |
| Item NO. | SP297 | SP262 | HKSC39-B | SP186 | SP187 |
| CPU | Cortex-A9 processor(1.5GHz) | Samsung Exynos 6-Core Processor(1.3GHz quad-core ARM Cortex-A7+1.7GHz dual-core ARM Cortex A15) | Samsung S3C2440 ARM9 Processor 400 MHz | Samsung Exynos Quad-core Processor 1.4GHz | Samsung Exynos Quad-core Processor 1.4GHz |
| OS | Android 4.4.2 Kitkat |
Windowns CE | Android 4.0 Ice Cream Sandwich | Android 4.0 Ice Cream Sandwich | |
| SSD Hard Driver | 32GB | 32GB | 32GB | 32GB | |
| Touch Screen Display | 7"LCD 1024x600 resolution touch screen |
8" 1024x768 LED-backlit glossy Multi Touch capacitive display with IPS technology | 7.0" 800x480 TFT Resistive Touch Screen | 7.9" 1024x768 LED capacitive Touch Screen | 7.9" 1024x768 LED Capacitive Touch Screen |
| Connectivity | Mini USB 2.0 USB 2.0 Wifi Micro SD card (supports up to 32GB) |
WI-FI(802.11b/g/n) DB16 DLC,USB 2.0,SD Card(Support up to 32GB) | USB 2.0 Ethernet Wi-fi | USB 2.0 Ethernet,Wi-fi,Bluetooth | USB 2.0 Ethernet,Wi-fi Bluetooth |
| Dual Band 802.11n Wi-Fi | 802.11 b/g/n | 2.4GHz | 2.4GHz&5GHz | 2.4GHz&5GHz | |
| Internal Battery | 3.7V/3200 mAh | 3.7V/5000 mAh lithium-polymer battery | 11000 mAh 3.7V Lithium Polymer Battery | 11000 mAh 3.7v Lithium Polymer Battery | |
| Camera(rear) | 8.0 Megapixel AF with Flashlight | N/A | 5.0 Mexgapixel AF with Flashlight | 5.0 Mexgapixel AF with Flashlight | |
| Wireless VCI | Yes | Yes | Yes | Yes | Yes |
| Optional Lab Scope | Yes | Yes | |||
| Optional Video Scope | Yes | Yes | |||
| Boot Up Time | Less than 40 seconds | Less than 40 seconds | 40 Seconds | 20 Seconds | 20 Seconds |
| Complete OEM-Specific Scanner Coverage | Yes | Yes | Yes | Yes | Yes |
| AutoVIN Technology | Yes | Yes | Yes | Yes | |
| MaxiFix Cloud-Based Information System | Yes | Yes | Yes | Yes | |
| Shop Manager | Yes | Yes | Yes | Yes | |
| ECU Coding | Minimum | Minimum | Minimum | Advanced | Advanced |
| ECU Flash Programming | Yes | ||||
| J2534 Hardware Included | Yes | ||||
| Subscription-Based On-Line Updates | Yes | Yes | Yes | Yes | Yes |
| Warranty | 1 Year | 1 Year | 1 Year | 1 Year | 1 Year |